How to Install an SSL Certificate on Your Website Step by Step
If your website still loads with “Not Secure” in the address bar, you have probably been told you need to install an SSL certificate — and you have probably found the explanations of how to do it either confusingly technical or strangely vague. The reality is that installing SSL in 2026 is significantly simpler than it was even a few years ago, mostly free in the cases that apply to most small business websites, and well within the reach of any site owner who can follow a step-by-step process. The work is mostly clicking the right buttons in the right order, not writing code.
This guide walks through the full installation process — choosing the right type of certificate, getting it, installing it on your hosting account, configuring your website to use HTTPS properly, and fixing the common problems that come up afterwards. It is written for site owners who are not developers but are comfortable navigating a hosting control panel. If you want the broader context of where SSL fits in ongoing website upkeep, our complete website maintenance guide sets the foundation. This article is the focused, practical installation manual.
What an SSL certificate actually does
An SSL certificate (more accurately called a TLS certificate today, though the SSL name has stuck) does three things at once. First, it encrypts the data travelling between your visitor’s browser and your website’s server, so anyone intercepting that traffic — on a coffee shop wifi, a corporate network, or anywhere else — cannot read it. Second, it verifies that the site visitors are talking to is genuinely the site they think it is, and not an impostor. Third, it produces the visual trust signal — the padlock in the browser address bar — that visitors and search engines have come to expect.
The technical mechanism is a cryptographic handshake. When a browser connects to an HTTPS site, the server presents its certificate, the browser verifies the certificate against a trusted certificate authority, and the two sides exchange the keys needed to encrypt the rest of the conversation. All of this happens in a fraction of a second and is invisible to the visitor. What they see is the secure padlock and the absence of the “Not Secure” warning that browsers now display prominently on any site without a certificate.
Do you actually need SSL on your website?
Yes — and the reasons have stacked up to the point where SSL is no longer optional for any serious business website. Five forces have made it close to mandatory.
Browsers show “Not Secure” warnings. Chrome, Firefox, Safari and Edge all display a clear “Not Secure” warning in the address bar for any site without a certificate. Visitors see it before they see your content. The conversion impact is real and measurable — sites adding SSL typically see a small but immediate lift in time on site and a reduction in instant bounce.
Google uses HTTPS as a ranking signal. Google announced HTTPS as a ranking factor back in 2014, and the weight given to it has increased steadily since. Two otherwise-equivalent sites where one has SSL and the other does not will see the secured one ranked higher. The signal is small individually but compounds across hundreds of competitive queries.
Customer trust depends on it. Modern customers are conditioned to look for the padlock before entering any personal information, and many will leave a site without it rather than risk submitting a form. For eCommerce, the relationship is direct — sites without SSL get a fraction of the conversions of sites with it, because no reasonable buyer will enter card details on a page that the browser is warning them about.
PCI compliance requires it for eCommerce. Any site processing payment cards is required to be served over HTTPS as a condition of payment processor agreements. Without SSL, the merchant account either cannot be opened or will be flagged for review.
Legal and regulatory requirements increasingly demand it. Data protection laws in many regions now treat the transmission of personal data over unsecured connections as a compliance issue. Even sites that do not handle payments often handle email addresses, contact form submissions, account credentials or other personal data that should be encrypted in transit. SSL is one piece of a broader picture, and our complete website security guide covers the wider context of how SSL fits alongside the other defences a business website needs.
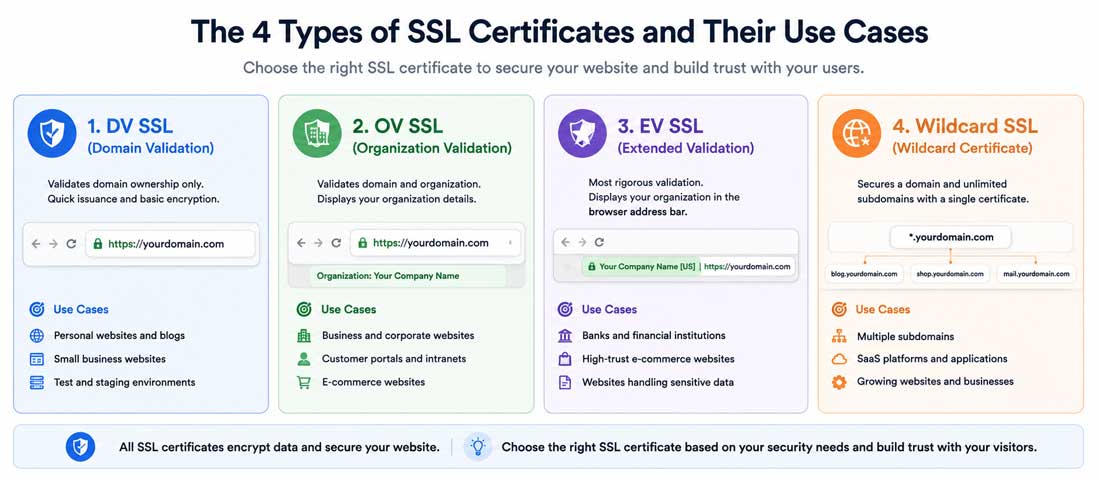
The four types of SSL certificate, compared
Not all SSL certificates are the same. They differ in what they verify, how many domains they cover, and what they cost. Choosing the right type for your situation is the first decision in the installation process. The table below summarises the four main types you are likely to encounter.
| Certificate type | What it verifies | Typical cost per year | Best for |
|---|---|---|---|
| Domain Validated (DV) | You control the domain | Free – $50 | Small business sites, blogs, brochure sites |
| Organisation Validated (OV) | The domain and the business identity | $50 – $200 | Corporate sites, mid-sized businesses |
| Extended Validation (EV) | Full legal business verification | $150 – $400+ | Banks, large eCommerce, regulated industries |
| Wildcard | The main domain plus all subdomains | $50 – $300+ | Sites with multiple subdomains (shop., blog., app.) |
For the great majority of business websites, a Domain Validated (DV) certificate is sufficient. The encryption it provides is identical to what an EV certificate provides — the difference is only in what was verified about you before the certificate was issued. The visual difference (the padlock looks the same in modern browsers regardless of certificate type) and the practical security difference are both minimal for the typical business site. EV certificates used to display a green organisation name in the address bar, but most browsers have removed that distinction in recent years.
Free vs paid SSL: which should you choose?
The free SSL revolution started with Let’s Encrypt in 2016, and the result has been that the cost barrier for SSL has effectively been removed for most websites. Free certificates from Let’s Encrypt or via Cloudflare provide the same encryption strength as the most expensive paid certificates. The padlock looks the same to visitors. The browser trust is the same.
Free SSL is the right choice when you have a standard business website on standard hosting, you want a Domain Validated certificate, you are comfortable with the 90-day renewal cycle (which is almost always automated), and you do not need wildcard coverage. This describes most websites, and the savings — typically $50 to $200 per year compared with a paid equivalent — are real but not the main argument. The main argument is that the work to set up free SSL is genuinely no harder than paid SSL once you know where to click.
Paid SSL is the right choice in specific situations. When you need Organisation Validated or Extended Validation for trust signalling in a regulated industry. When you need a wildcard certificate for multiple subdomains and the free wildcard options do not fit your hosting setup cleanly. When you want the support relationship that comes with a paid certificate — being able to call someone if something goes wrong. When you are running an enterprise site where the marginal cost is invisible compared with the time saved by predictable annual renewals rather than 90-day cycles. The paid choice is rarely about better security; it is about service, validation level, or convenience.
The seven-step SSL installation process
The actual installation runs in a consistent sequence regardless of whether you choose free or paid SSL, and regardless of what hosting platform you use. The seven steps below cover the work in the order to do it. Specific tools differ; the structure does not.
-
Choose your SSL certificate type and provider
Decide between free (Let’s Encrypt via your host, or via Cloudflare) and paid (Sectigo, DigiCert, GoDaddy, or via your host’s SSL marketplace). For most sites, free is the right answer. Decide between single-domain, wildcard, or multi-domain coverage. For most sites, a single-domain certificate for yoursite.com (which automatically covers both yoursite.com and www.yoursite.com) is sufficient. -
Verify domain ownership and DNS
Whichever provider you choose will need to verify that you actually control the domain. This is usually done either through an email sent to a designated admin address on your domain, through a DNS TXT record they ask you to add, or through a file they ask you to upload to your website. The DNS or file method is usually the most reliable. Follow the verification process the provider specifies; the certificate is issued only after verification succeeds. -
Generate a Certificate Signing Request (CSR) if needed
For paid certificates and some manual installations, you will need to generate a CSR — a small file your server creates that contains information about your domain and a public key. Most hosting control panels (cPanel, Plesk, DirectAdmin) have a CSR generator built in. For free certificates installed through automated tools (your host’s one-click installer, Cloudflare, Let’s Encrypt via Certbot), the CSR is generated automatically and you can skip this step. -
Install the certificate on your hosting account
This is the actual installation. The exact steps depend on your hosting environment. For shared hosting with cPanel: SSL/TLS → Install and Manage SSL → paste or upload the certificate, private key and CA bundle. For managed WordPress hosts (WP Engine, Kinsta, SiteGround): SSL is usually a one-click toggle in the host’s dashboard. For VPS or dedicated servers: install via Certbot for Let’s Encrypt, or manually configure the certificate files in Apache or Nginx. The installation places the certificate on the server and tells the web server to use it for HTTPS connections. -
Configure your website to use HTTPS
On WordPress, change the Site URL and WordPress URL in Settings → General from http:// to https://. On other platforms, update the equivalent setting. This tells your site to generate all internal links as HTTPS rather than HTTP. Without this step, the certificate is installed but your site is still serving everything over HTTP. The proper WordPress setup is part of the foundational work covered in our ongoing website maintenance programmes, because misconfigured HTTPS is one of the most common quiet problems we find in audits. -
Force HTTP to HTTPS with proper redirects
Add a 301 redirect that sends any HTTP request to the HTTPS version of the same URL. On Apache hosting, this goes in the .htaccess file. On Nginx, in the server configuration. On Cloudflare, there is a toggle called Always Use HTTPS. The redirect ensures that anyone arriving via an old HTTP link is automatically and permanently sent to the secure version. Without it, you have an HTTPS site and an HTTP site running side by side, which is a configuration problem. -
Update internal links, verify, and submit to Google
Run a tool like Better Search Replace (WordPress) or a manual database update to change any hardcoded HTTP links in your content to HTTPS. Use a tool like Why No Padlock or SSL Labs to scan the site and confirm there are no mixed-content warnings. Add the HTTPS version of your site to Google Search Console as a new property, submit a new sitemap, and request indexing of key pages. This is the step that translates the SSL installation into search engine recognition.
Want SSL Installation Done Properly Without doing it Yourself?
If you would rather have an experienced team handle the SSL setup, redirects, mixed-content cleanup and Search Console verification, we are happy to take it on. It is part of how we keep client websites genuinely healthy.
How to install SSL on cPanel hosting (the most common scenario)
cPanel is the most widely used hosting control panel, and most shared and reseller hosting accounts run on it. If your hosting provider has given you a cPanel login, the SSL installation process is straightforward and largely automated.
Log into cPanel and look for the SSL/TLS section under Security. Most modern cPanel installations include AutoSSL — an automated Let’s Encrypt installer that handles the certificate request, validation, installation and renewal entirely behind the scenes. If AutoSSL is enabled for your account, the certificate may already be installed. Check the SSL/TLS Status page under Security — domains showing a green padlock are already covered, and the work is done.
If AutoSSL is not enabled or not available, you can install Let’s Encrypt manually. Most hosts provide a Let’s Encrypt option in cPanel — sometimes under SSL/TLS, sometimes as a separate icon. Select the domain, choose your subdomains if applicable, and click Issue. The certificate is generated and installed in a few minutes. The hosting provider’s documentation will have the exact menu paths for their cPanel theme.
If you have a paid certificate from another provider, the manual installation process is in SSL/TLS → Manage SSL Sites. You paste the certificate (provided by the issuer), the private key (which your CSR generated when you ordered the certificate), and the CA bundle (also provided by the issuer). Click Install. The certificate is now active for the selected domain. Test by visiting the site with https:// in the URL and confirming the padlock appears.
How to install SSL with Cloudflare (the free and easy alternative)
Cloudflare provides free SSL for any site, regardless of hosting, by sitting between the visitor and your origin server. The setup takes about ten minutes and is one of the simplest paths to SSL available.
Sign up for a free Cloudflare account at cloudflare.com and add your domain. Cloudflare will scan your existing DNS records and provide two nameservers for you to use. Change your domain’s nameservers at your registrar (the place you bought the domain) to point to the Cloudflare-provided nameservers. The change takes anywhere from a few minutes to 24 hours to propagate. Once propagated, Cloudflare is in front of your site, and the free SSL is active for your domain by default.
In the Cloudflare dashboard, go to SSL/TLS and choose the encryption mode. Three options exist. Flexible encrypts the connection between the visitor and Cloudflare but not between Cloudflare and your origin server — this is the easiest setup but it is not fully secure. Full encrypts both legs but does not verify the origin certificate. Full (Strict) encrypts both legs and verifies the origin certificate, which is the most secure option but requires your origin to also have an SSL certificate (which can be a free Let’s Encrypt certificate from your host, or a free Cloudflare-provided Origin Certificate that you install on your server). Full (Strict) is the right choice for any serious site; Flexible is acceptable only for sites where compromise is genuinely low-stakes.
Finally, enable Always Use HTTPS in the same SSL/TLS section. This is Cloudflare’s automatic HTTP-to-HTTPS redirect. Activate it and the work is essentially done — your site is now served over HTTPS with no further configuration needed.
How to install Let’s Encrypt SSL manually (for VPS and dedicated servers)
For sites running on VPS or dedicated servers without cPanel, the standard approach is to install Let’s Encrypt using Certbot — the free, official tool maintained by the Electronic Frontier Foundation.
Connect to your server via SSH. Install Certbot using your server’s package manager (the exact command depends on whether you are running Ubuntu, Debian, CentOS or another distribution — Certbot’s website provides the exact commands for each environment). Once Certbot is installed, the command to generate and install a certificate is typically a single line: sudo certbot --apache for Apache or sudo certbot --nginx for Nginx. The command prompts for your email, asks which domains to cover, and handles the validation, certificate issuance and server configuration automatically.
After installation, Certbot also configures automatic renewal. Let’s Encrypt certificates expire after 90 days, and Certbot includes a cron job or systemd timer that checks for renewal twice daily and renews any certificate within 30 days of expiry. Verify the renewal is configured by running sudo certbot renew --dry-run. If that succeeds, your renewal will happen automatically forever without further attention.
After installation: the five things you must do
An SSL certificate installed is not the same as a website fully migrated to HTTPS. The work after installation is what completes the migration and ensures the site behaves correctly. Five tasks need to happen, in order.
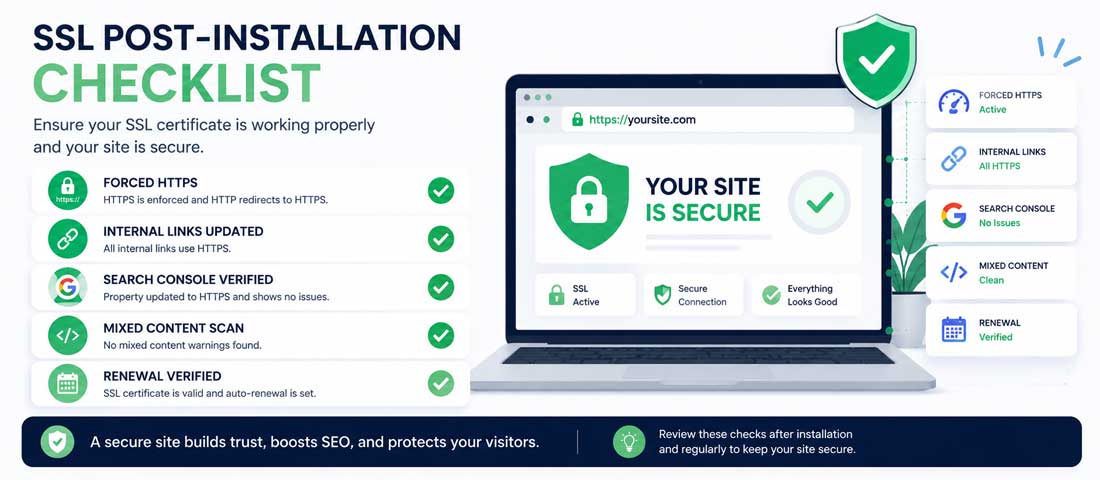
Force HTTPS for every request. Confirm that visitors arriving on the HTTP version are automatically redirected to HTTPS. Test by typing http://yoursite.com directly in the browser — the address should change to https:// before the page loads. If it does not, your redirect is not working, and the SSL is only partially active.
Update all internal links to HTTPS. Old content may contain hardcoded http:// links in posts, image sources, embedded videos, navigation menus, or theme files. On WordPress, run Better Search Replace to change every instance of http://yoursite.com to https://yoursite.com across the database. This eliminates mixed-content warnings, where an HTTPS page tries to load an HTTP resource and the browser shows a security warning.
Update Google Search Console. Google treats HTTP and HTTPS as different sites. Add the HTTPS version of your domain as a new property in Search Console, submit a new XML sitemap, and request indexing of key pages. Without this step, Google may continue showing the HTTP version in search results for weeks, undermining the SEO benefit of the SSL.
Check for mixed content warnings. Run the live site through a free tool like Why No Padlock or the developer console in Chrome. Any HTTP resource being loaded by an HTTPS page will be flagged. Fix each one — usually by changing the image, script or video URL from http:// to https://. Mixed content warnings cause browsers to display a degraded security indicator and are a quiet but real conversion problem.
Verify automatic renewal is configured. Free SSL certificates from Let’s Encrypt expire every 90 days. Paid SSL certificates expire annually. In both cases, the renewal should be automatic — but you need to confirm it actually is. For Let’s Encrypt via Certbot, run a dry-run renewal. For hosting-provided SSL, check the SSL status page for the renewal date. For paid certificates, set a calendar reminder for two weeks before expiry to catch any renewal issues. Expired certificates are one of the most common causes of sudden site outages, and the fix is one you should not be discovering at the moment of failure. The same discipline applies to the wider site — a strong 3-2-1 backup strategy is the companion protection that catches everything SSL alone cannot.
Common SSL installation problems and how to fix them
Even straightforward SSL installations sometimes hit problems. The good news is that the problems fall into a small set of recognisable patterns, each with a known fix.
Mixed content warnings. The page loads over HTTPS but the browser shows a broken padlock or “Not Fully Secure”. This means at least one resource on the page (image, script, stylesheet, video) is still being loaded over HTTP. Identify the resource using the browser’s developer console — it will name the specific file. Fix by changing the URL to HTTPS, or by replacing the resource if the HTTP version is hardcoded in a theme or plugin.
Certificate not trusted by browser. Visitors see a warning that the certificate is invalid or untrusted. This usually means the CA bundle (intermediate certificate chain) was not included during installation. The certificate is valid but the browser cannot verify its chain back to a trusted root. Reinstall the certificate, this time making sure to paste the CA bundle in the appropriate field — your certificate provider will have supplied it alongside the certificate itself.
Redirect loop after enabling HTTPS. The site goes into an endless redirect loop and never loads. This is usually a conflict between WordPress’s own HTTPS settings, an .htaccess redirect rule, and a Cloudflare or hosting-level redirect. The fix is to remove duplicate redirects — pick one location (Cloudflare, .htaccess, or WordPress configuration) to handle the HTTP-to-HTTPS redirect, and disable the others. The investigation usually identifies which combination is conflicting.
WordPress admin or login does not work after SSL. After moving WordPress to HTTPS, the admin panel may stop loading, get stuck in a loop, or refuse to accept logins. The fix is usually to add a line to wp-config.php — define('FORCE_SSL_ADMIN', true); — which explicitly tells WordPress to use HTTPS for the admin panel. If the admin is on a different subdomain, additional configuration may be needed.
The padlock shows green but Google still indexes HTTP. The certificate is installed, the redirects work, but Google Search Console keeps showing the old HTTP URLs. This is the missing-Search-Console-update problem. Add the HTTPS version as a separate property in Search Console, submit a new sitemap, and request reindexing. Google typically catches up within a few weeks. Patience is the main requirement here — the SSL is working; only the search index is lagging.
How to verify your SSL is working correctly
Once everything is installed, three quick checks confirm the SSL is genuinely working and not just appearing to. None of these takes more than a few minutes.
First, visit your site with http:// in the URL. The address bar should change to https:// before the page finishes loading. The padlock should appear. Click the padlock and confirm the certificate is valid and matches your domain. Try several internal pages from the navigation to make sure they all load over HTTPS — sometimes a stray page is missed by the redirect rules.
Second, run the SSL Labs SSL Test at ssllabs.com/ssltest. This free tool grades your SSL configuration from A+ down to F, identifying any weak configurations, missing intermediate certificates, or insecure cipher suites. A grade of A or A+ indicates a properly-configured SSL. Anything lower deserves attention — usually a missing CA bundle, an outdated TLS version still enabled, or weak ciphers that should be disabled. The fix is in your hosting configuration.
Third, scan for mixed content. Use the Why No Padlock tool at whynopadlock.com or simply open your browser’s developer console (F12 in Chrome) and look for warnings in the Console tab. Both will flag any HTTP resources being loaded by an HTTPS page. Fix each warning. The broader SEO context of getting SSL right ties into the standard technical SEO foundations work, because Google treats HTTPS as one of several technical health signals it watches.
SSL mistakes to avoid during installation
The mistakes we see during SSL installation are predictable and almost all of them produce sites that look secured but are not quite right. Avoiding them is much easier than recovering from them after the fact.
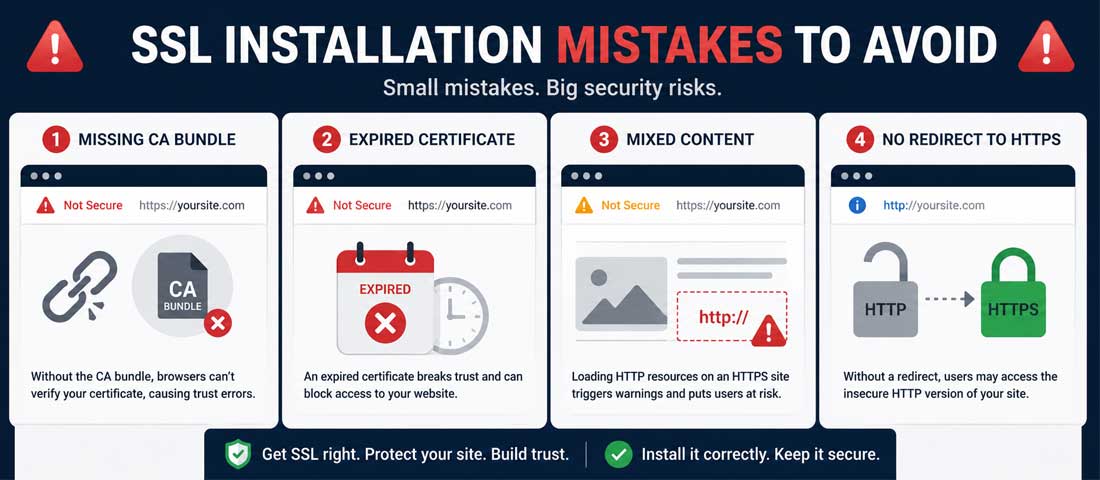
- Installing the certificate but not forcing HTTPS. The certificate works for anyone who types https:// but the HTTP site continues serving alongside. Visitors and search engines see both versions, which is a configuration problem and dilutes your SEO authority.
- Ignoring mixed content warnings. A page that loads over HTTPS but pulls an image over HTTP shows a degraded security indicator to visitors. The padlock breaks, trust suffers, and the SEO benefit erodes.
- Forgetting to update Google Search Console. Google treats HTTP and HTTPS as different sites. Without registering the HTTPS version, you lose search visibility during the transition and may take weeks to recover.
- Skipping the CA bundle during installation. A certificate without the intermediate chain shows as “not trusted” in some browsers even though it is technically valid. Always paste the CA bundle alongside the certificate.
- Not verifying automatic renewal. A 90-day Let’s Encrypt certificate that does not auto-renew expires silently and takes the site down. Run a renewal dry-run and confirm the cron job is in place.
- Choosing Flexible mode in Cloudflare for a serious site. Flexible encrypts only half the connection. Full (Strict) is the right choice for any site where security actually matters.
- Buying an expensive paid certificate when free Let’s Encrypt would do the same job. For most business sites, paid certificates provide no meaningful additional security and the money is better spent elsewhere.
- Forgetting the www and non-www versions. Make sure both www.yoursite.com and yoursite.com are covered by the certificate and that one redirects to the other consistently. Inconsistent www handling produces duplicate content and SEO problems.
- Not adding HSTS after the migration is complete. HSTS (HTTP Strict Transport Security) is a header that tells browsers to always use HTTPS for your domain, even on the first visit. Once you are confident the HTTPS site is fully working, enabling HSTS adds a meaningful security layer.
- Installing on the wrong domain. Make sure the certificate covers the exact domain visitors will use. A certificate for yoursite.com does not cover www.yoursite.com unless explicitly included.
When to bring in professional help
This guide is detailed enough that most site owners can install SSL themselves, especially with managed hosting where the steps are largely automated. There are situations where professional help is genuinely worth the cost.
Bring in help when the site is complex — multiple subdomains, custom configurations, a non-standard hosting setup — where the standard guidance does not cleanly apply and small misconfigurations have outsized consequences. Bring in help when SSL installation is part of a larger migration project, where the SSL piece is one element of several moving parts and getting all of them right at once is harder than each one individually. Bring in help when the site is eCommerce with payment processing, where PCI compliance has specific requirements and an incomplete SSL migration can create real regulatory exposure.
For ongoing SSL care — keeping renewals working, monitoring for expiry, fixing mixed content as new content is added, maintaining HSTS configuration — structured care is more reliable than ad-hoc attention. Our website maintenance services include SSL monitoring and renewal as part of every plan, because expired SSL is one of the most common causes of sudden site outages, and the cost of preventing it is trivial compared with the cost of recovering from it. For sites being built from scratch, SSL is configured properly from day one as part of every custom website build we deliver, because retrofitting it later is always slower than building it in.
How long does SSL installation take?
The realistic timeline depends on what you are installing and where. The fastest installations — Cloudflare free SSL, AutoSSL on cPanel, one-click SSL on managed hosting — can be complete in fifteen to thirty minutes from start to finish, including the post-installation tasks. The certificate issues in seconds, the redirects are automated, and the verification is quick.
Mid-range installations — manual Let’s Encrypt via Certbot on a VPS, paid certificate installation via cPanel, or installations that require migration of an existing site from HTTP to HTTPS — typically take one to three hours including the migration work, internal link updates and Search Console reconfiguration. For a site with existing content, the migration is the slowest part; the SSL itself is quick.
Complex installations — multi-domain configurations, wildcards across many subdomains, sites with custom server setups, sites where mixed content has accumulated for years — can take a working day or more to do properly, with several more days of monitoring afterwards to catch any issues. These are the installations where professional help most clearly pays for itself, because the time difference between an experienced engineer and a first-time installer is large.
The full picture of SSL as one piece of a hardened, properly maintained website is what makes the difference between a site that quietly handles its own security and one where every change requires attention. Setting up SSL well is straightforward; keeping it set up well over years requires the discipline of treating the website as a living asset rather than a one-time build. The reward for that discipline is a site that visitors trust, search engines rank, and that never produces the kind of expensive incident that comes from a forgotten expired certificate.
Frequently asked questions
| What is an SSL certificate? | An SSL certificate (technically TLS today, though SSL is the name still in common use) is a digital certificate installed on a web server that does three things at once. It encrypts the data travelling between a visitor’s browser and the server, verifies that the site is genuinely who it claims to be, and produces the padlock icon visitors see in the address bar. Modern browsers display “Not Secure” warnings on sites without one, Google uses HTTPS as a ranking signal, and customers expect to see the padlock before entering personal information. SSL is the foundation of how secure communication works on the modern web. |
| Do I need a paid SSL certificate or is a free one enough? | For most small to mid-sized business websites, a free SSL certificate from Let’s Encrypt or via Cloudflare provides exactly the same encryption strength as the most expensive paid certificate. The padlock looks the same to visitors, the browser trust is the same, and the search engine signal is the same. Paid certificates are worth the cost in specific situations — when you need Extended Validation for trust signalling in a regulated industry, when you need a wildcard for multiple subdomains in a way free options do not cover cleanly, or when you want the support relationship that comes with paid services. For a typical brochure, blog or small business site, free SSL is genuinely sufficient. |
| How much does an SSL certificate cost? | SSL certificate costs range from completely free to several hundred US dollars per year depending on the type. Free options include Let’s Encrypt (renewed every 90 days, usually automatically) and Cloudflare’s free tier (renewed automatically). Domain Validated paid certificates typically cost $10 to $50 per year. Organisation Validated certificates run $50 to $200 per year. Extended Validation certificates cost $150 to $400 or more annually. Wildcard certificates that cover all subdomains generally cost $50 to $300 per year. For most small business websites, the free options are sufficient, and the savings can be invested in other parts of website care. |
| How long does it take to install an SSL certificate? | Simple installations using Cloudflare, AutoSSL on cPanel, or one-click SSL on managed hosting can be complete in 15 to 30 minutes including post-installation tasks like forcing HTTPS and updating Search Console. Mid-range installations involving manual Let’s Encrypt setup, paid certificate installation, or migration of an existing HTTP site typically take one to three hours including internal link updates and verification. Complex installations with multiple subdomains, wildcards, or accumulated mixed-content issues can take a working day or more. The certificate itself issues quickly; most of the time is spent on the surrounding migration work that ensures the SSL is genuinely complete. |
| Will SSL slow down my website? | No, not in any measurable way for modern websites. Older claims that SSL adds significant overhead were true 15 years ago but no longer reflect how the technology works in 2026. HTTP/2 and HTTP/3 — which require HTTPS — are actually faster than the old HTTP/1.1 protocol, so adding SSL can make a site faster overall by enabling these newer protocols. The cryptographic handshake itself takes a fraction of a second on the first connection and is reused for subsequent requests within the same session. The performance difference between HTTP and HTTPS on a modern web stack is essentially negligible, and any real slowdown after SSL installation usually indicates a configuration issue rather than an inherent SSL problem. |
| Do I need to do anything to renew my SSL certificate? | For most installations, renewal is automatic and requires no manual action. Let’s Encrypt certificates expire every 90 days but Certbot, cPanel AutoSSL and Cloudflare all handle renewal automatically without intervention. Paid certificates typically last one to two years and many issuers offer automatic renewal as well. The key step is to verify that automatic renewal is genuinely working — run a renewal dry-run if you are using Certbot, or check the renewal date on your hosting SSL status page. The single most common cause of sudden SSL outages is an expired certificate that nobody knew was not auto-renewing. Set a calendar reminder for two weeks before any non-automated renewal to catch issues before they cause downtime. |
| What happens if my SSL certificate expires? | When an SSL certificate expires, browsers immediately display prominent warnings on the site — full-page red “Your connection is not private” screens that visitors cannot easily bypass. Most visitors leave instantly rather than click through. Search engines may temporarily de-rank the site, and any active eCommerce or payment processing typically stops working. The fix is to renew or reinstall the certificate, which usually takes minutes once you start, but the damage to visitor trust and rankings during the outage is real. This is why automatic renewal verification matters — preventing the expiry is much easier than recovering from one, and the cost of prevention is essentially zero compared with the cost of even a few hours of downtime. |
Want SSL and Ongoing Website Security Handled Properly?
We set up SSL correctly, monitor for renewal, fix mixed content as it appears, and keep the broader security layer in good shape as part of our website care programmes. With 12+ years of experience and over 2,500 websites delivered, we know what genuinely secure looks like. Send us your domain and we will respond within one business day.