
App Store rejection is one of the most avoidable delays in mobile development, and it happens to a substantial share of first submissions. What makes it frustrating is that the vast majority of rejections are not close calls or judgment disputes — they are the same dozen or so issues repeating endlessly across thousands of apps, most of which could have been caught in an hour of pre-submission checking. A rejection typically costs a week: a day or two waiting for review, the rejection notice, the fix, resubmission, another wait. Two or three rounds of that and a launch date has slipped by a month for reasons that had nothing to do with the quality of the app.
This guide is the practical version — not a paraphrase of Apple’s guidelines, which you can read yourself, but a breakdown of which specific guidelines actually cause rejections in practice, what triggers them, and what the fix looks like. If you want the wider context of planning and building a mobile app before you get to submission, our complete mobile app development guide covers that ground. This article focuses tightly on the submission itself: the pre-flight checklist, the rejection reasons that matter, the review notes that quietly decide your outcome, and what to do when you’re rejected anyway.
Understanding the mechanics helps, because a lot of anxiety around submission comes from treating review as an opaque process when it is fairly predictable.
When you submit a build, it goes into a queue and is examined by a human reviewer, supported by automated checks that run first. The automated pass catches technical issues — missing entitlements, invalid binaries, private API usage, malformed metadata. The human pass is where guideline interpretation happens: does the app work as described, does it have enough functionality to justify existing, does the content match the age rating, does the privacy disclosure match what the app actually does.
Timelines. Apple has become considerably faster than its reputation suggests. Most reviews complete within 24 to 48 hours, and a large majority within a day. Plan for 48 hours and treat anything faster as a bonus. First submissions of a brand-new app sometimes take slightly longer than updates to an established one. Submissions immediately before major holidays queue up badly — the week before Christmas and the days around Chinese New Year are consistently slower.
What a reviewer actually does. A reviewer spends a fairly short amount of time with your app — typically minutes rather than hours. They install it, open it, try to reach the main functionality, check that the described features exist, verify anything involving payments or accounts, and confirm the metadata matches reality. This has an important implication: anything that blocks a reviewer from reaching your app’s core functionality within the first minute is a likely rejection, regardless of how good the app is beyond that point.
Google Play, by contrast, leans more heavily on automated review with human review reserved for flagged cases. Approval is often faster — hours rather than days for updates — but Play has become considerably stricter over the past few years, particularly on data safety declarations, target API level requirements, and policy compliance for sensitive permissions. Do not assume Play is a rubber stamp; the enforcement is just distributed differently.
Apple’s guidelines run to thousands of words. In practice, a small number of them account for most rejections. These are the ones worth knowing by number.
Guideline 2.1 — App Completeness. The broadest and most common. It covers crashes, obvious bugs, placeholder content, broken links, features that don’t work, and — very commonly — missing demo account credentials for an app that requires login. If a reviewer cannot get past your sign-in screen, your app is incomplete from their perspective, no matter how finished it actually is.
Guideline 4.2 — Minimum Functionality. The one that catches the most first-time developers by surprise. Apple rejects apps that are essentially a website in a wrapper, apps that duplicate what a mobile browser already does, and apps with too little native functionality to justify being an app. If your app is a WebView pointing at your existing site, expect rejection. This is the single most common structural rejection for businesses building their first app.
Guideline 5.1.1 — Data Collection and Storage. Covers privacy policy requirements, requesting data you don’t need, requesting permissions without explaining why, and — importantly — requiring account registration for functionality that doesn’t need an account. If your app makes users sign up before they can see anything, and the app’s core function doesn’t require an account, that’s a rejection.
Guideline 3.1.1 — In-App Purchase. If you sell digital content, subscriptions, or features that are consumed within the app, they must go through Apple’s in-app purchase system. Linking out to your website to take payment for digital goods is a rejection. Physical goods and real-world services are exempt and can use any payment method — this distinction causes enormous confusion and a lot of rejections.
Guideline 2.3 — Accurate Metadata. Screenshots that don’t reflect the current app, descriptions promising features that don’t exist, keyword stuffing in the app name or subtitle, and age ratings that don’t match the content. Reviewers do compare your screenshots against the actual app.
Guideline 4.0 — Design. Broad and somewhat subjective, covering interfaces that are confusing, non-standard in ways that harm usability, or visually unfinished. This is where genuinely poor UI/UX design becomes a submission blocker rather than just a quality problem — Apple does reject apps for looking and feeling unfinished, even when they technically function.
Guideline 5.1.5 — Location Services and related permission guidelines. Requesting permissions without a clear purpose string explaining why, requesting location when the app doesn’t need it, or requesting always-on location when when-in-use would suffice.
Guideline 1.2 — User-Generated Content. Any app where users can post content must have a content filter, a reporting mechanism, a way to block abusive users, and a published means of contacting you. Missing any of these four is a reliable rejection for social or community apps.
Several requirements are easy to miss because they’re not obvious from building the app, only from reading the guidelines carefully.
Account deletion inside the app. If your app supports account creation, it must also support account deletion from within the app — not a support email, not a web form, an actual in-app deletion path that removes the account. This requirement has caught an enormous number of apps since it became mandatory, and it is a hard rejection with no negotiation.
Sign in with Apple. If you offer any third-party social login — Google, Facebook, X, LinkedIn — you must also offer Sign in with Apple. If you only offer email and password, you don’t need it. Partial implementations get rejected.
App Privacy details. Your App Store listing requires a completed privacy disclosure covering what data you collect, whether it’s linked to identity, and whether it’s used for tracking. Reviewers check this against the app’s actual behaviour and against your third-party SDKs. Analytics, crash reporting, and advertising SDKs all collect data on your behalf, and it must be declared. Undeclared SDK data collection is a common and avoidable rejection.
App Tracking Transparency. If you track users across other companies’ apps and websites — most commonly through advertising SDKs — you must present the ATT prompt before doing so. Accessing the IDFA without the prompt is a rejection.
Permission purpose strings. Every permission your app requests needs a purpose string in the Info.plist explaining specifically why. Generic strings like “This app needs camera access” get rejected. Specific strings like “Used to scan receipts for expense claims” pass. The bar is whether a user reading it would understand the actual reason.
Support URL and privacy policy URL. Both must be live, reachable, and relevant when the reviewer checks them. A privacy policy URL returning a 404, or pointing at a generic template that doesn’t mention your app, causes rejection.
Encryption compliance. Almost every app uses HTTPS, which counts as encryption. You need to declare it and, in most cases, claim the exemption for standard encryption. Missing this declaration blocks the build from being submitted at all.
Work through these before you submit anything. Most rejections are caught here.
Want Your Submission Reviewed Before you Send It?
If you have a build ready and want a second pair of eyes on it before you submit, we run pre-submission audits against the guidelines that actually cause rejections — functionality, privacy declarations, metadata, payment model and the reviewer experience. Catching a problem before submission costs an hour; catching it after costs a week.
Not all rejections are equal. Some are a metadata edit and a resubmission; others mean redesigning the product. Knowing which is which before you submit tells you where to concentrate effort.
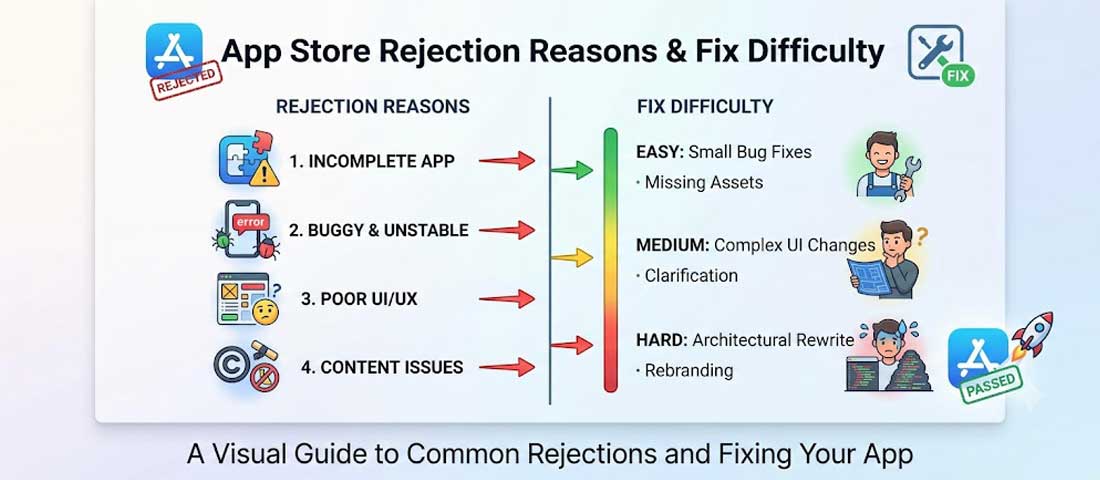
| Guideline | What triggers it | How common | Cost to fix |
|---|---|---|---|
| 2.1 — Completeness | Crashes, bugs, broken demo login, placeholder content | Very high | Low to moderate |
| 4.2 — Minimum functionality | Web wrapper, too little native capability | High for first-time apps | Very high — architectural |
| 5.1.1 — Data and privacy | Forced registration, undeclared collection, weak purpose strings | High | Low to moderate |
| 3.1.1 — In-app purchase | Selling digital goods outside Apple’s IAP | High for monetised apps | Moderate to high |
| 2.3 — Accurate metadata | Outdated screenshots, overstated description, keyword stuffing | Moderate | Very low — no new build needed |
| 4.0 — Design | Unfinished, confusing or non-standard interface | Moderate | Moderate to high |
| 1.2 — User-generated content | Missing filtering, reporting, blocking or contact route | High for social apps | Moderate |
| 5.1.1(v) — Account deletion | Account creation without in-app deletion | High | Moderate |
The row that should shape your planning is Guideline 4.2. Every other rejection on this list is fixable within days. A minimum functionality rejection means the thing you built is not, in Apple’s view, an app — and no amount of resubmission fixes that without changing what the product does. This is why the decision about what belongs in a native app versus what belongs on a mobile-optimised website needs making at the start of a project rather than at the end. The same platform-level thinking applies to choosing which platform to build for at all, which we cover in our comparison of iOS versus Android and which platform to build first.
Minimum functionality deserves its own section because it is both the most consequential rejection and the most misunderstood.
What Apple is actually objecting to. The App Store exists to distribute software that does things a website cannot. An app that loads your website inside a WebView adds nothing for the user over a browser bookmark, occupies storage, and dilutes the store. Apple rejects these consistently and has done so with increasing firmness.
What counts as sufficient native functionality. Push notifications that are genuinely useful rather than decorative. Offline capability — content cached and usable without a connection. Camera, microphone, GPS, accelerometer, or other hardware integration that serves a real purpose. Biometric authentication. Home screen widgets. Background tasks such as location tracking, sync, or downloads. Native navigation and gestures rather than web-page scrolling. Deep integration with system features like Share sheets, Siri shortcuts, HealthKit, or Apple Pay.
The grey area. Hybrid apps built with React Native, Flutter, or Capacitor are entirely acceptable — the framework doesn’t matter, the functionality does. A Capacitor app with real offline storage, push notifications, and camera integration passes comfortably. A Capacitor app that loads a remote URL and does nothing else does not. The question is never “which technology” but “what does this do that a browser doesn’t”.
Apps for existing businesses. Restaurants, salons, clinics, and retailers often want an app that mirrors their site. If the app only shows the same pages, it will be rejected. If it adds loyalty cards in Wallet, appointment reminders through push, offline menu access, or order tracking, it has a case. The business question worth asking honestly before building anything is whether customers would use an app they had to install — for many local businesses the answer is no, and a fast mobile-optimised website built as proper custom website development serves them better than an app that gets installed once and deleted.
Enterprise and internal tools avoid this problem entirely through the Apple Business Manager custom app distribution route, which does not go through public App Store review in the same way. If your app is genuinely only for your own staff or specific client organisations, this is often the correct path and sidesteps 4.2 completely.
Monetisation rejections are expensive because fixing them often means rebuilding the payment flow. The rules are clearer than their reputation suggests.
Must use Apple’s in-app purchase: digital content consumed in the app, subscriptions to digital services, premium features, virtual currency, game items, ad removal, and access to digital media. Apple takes its commission on these — 30% standard, 15% for small businesses under the Small Business Program and for subscriptions after the first year.
Does not need in-app purchase: physical goods, real-world services delivered outside the app, ride-hailing, food delivery, event tickets, professional services, and person-to-person payments. These can use Stripe, Razorpay, or any other processor with no Apple commission.
Where businesses get caught. A fitness app selling physical equipment through Stripe is fine; the same app selling a workout programme through Stripe is a rejection. A booking app taking payment for a real appointment is fine; the same app selling credits redeemable in-app is not. The test is whether the thing purchased is consumed digitally within the app.
Reader apps and external link entitlements. Rules here have shifted repeatedly through regulatory pressure in the EU, US, and elsewhere, and continue to change. Apps that provide access to previously purchased content — media, books, publications — have specific allowances, and certain jurisdictions now permit external purchase links under defined conditions. If your business model depends on this, check the current position rather than relying on anything written more than a few months ago, including this article.
Subscription requirements. Subscriptions need a clear description of what’s included, the price and billing period displayed before purchase, functional restore-purchases capability, and links to your terms and privacy policy from the purchase screen. Missing restore functionality is a frequent and easily-avoided rejection.
A meaningful share of rejections have nothing to do with the app binary at all. Metadata rejections are the cheapest to fix — often no new build required — but they still cost you a review cycle.
Screenshots. Must show the actual current app. Required at specific device sizes; check the current requirements in App Store Connect since the required sizes change as new devices launch. You may add captions and backgrounds, but the app content shown must be real. Screenshots showing features that don’t exist, or showing an older version, get rejected under 2.3.
App name and subtitle. Thirty characters each. Keyword stuffing — “Photo Editor Filters Collage Free Best” — gets rejected. Use the keyword field for keywords; it isn’t visible to users and exists precisely for this purpose.
Description. Describe what the app does. Don’t promise features that are coming soon, don’t reference other platforms, don’t include pricing that contradicts your in-app purchase configuration, and don’t include unverifiable superlatives.
Age rating. Answer the questionnaire honestly. Apps with user-generated content, unrestricted web access, or gambling-adjacent mechanics need appropriate ratings. Under-rating is a rejection, and misrating an app with a web view that can reach arbitrary content is a common oversight.
App preview videos, if used, must be captured from the app itself rather than being marketing animations, must not include external footage, and must be under thirty seconds.
Rejection is not failure and it is not usually final. The response process is straightforward and most rejections resolve within a cycle or two.
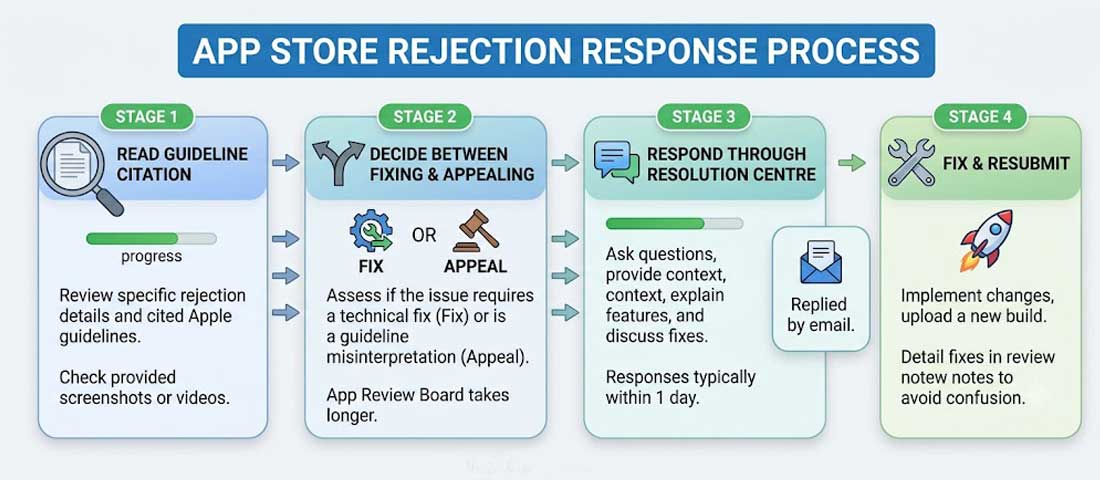
Read the actual guideline number. The rejection message cites a specific guideline. Read that guideline in full rather than working from the summary in the message. The specific wording usually makes clear exactly what needs to change, and reviewers frequently include a screenshot or screen recording showing the problem.
Reply in Resolution Centre before rebuilding. If the rejection reason is unclear, or if you believe the reviewer misunderstood something, respond and ask. This is a genuine conversation channel and responses typically come within a day. Many rejections resolve through explanation alone — particularly when a reviewer couldn’t find a feature that does exist, or misread the app’s purpose. Rebuilding before you understand the objection wastes a cycle.
Be direct and factual in responses. Explain what the app does, where the feature they missed is located, and how to reach it. Avoid arguing about interpretation and avoid citing other apps that do the same thing — “competitor X does this” is not a persuasive argument and reviewers hear it constantly.
Appeal when the guideline genuinely doesn’t apply. There is a formal appeals process through the App Review Board for cases where you believe the guideline was misapplied. Use it sparingly and only with a clear factual argument. Appeals take longer than fixing and resubmitting, so they’re worth it only when fixing would mean damaging the product.
Expedited review exists for critical bug fixes affecting live users and for time-sensitive events. It is granted at Apple’s discretion and works best when you have a genuine reason. Requesting it for an ordinary launch delay tends not to succeed, and repeated requests reduce your credibility for the times you actually need it.
Resubmission. Fix, upload a new build, and describe what changed in the review notes. Explicitly referencing the previous rejection and what you did about it helps the next reviewer — they can see the history, and a clear note saves them reconstructing it.
If you’re shipping to both stores, the differences matter enough to plan around.
Review model. Play leans on automated review with human escalation for flagged apps. Updates to established apps often publish within hours. New apps and apps in sensitive categories take longer, and new developer accounts face additional scrutiny including a testing requirement before production release.
Data safety section. Play’s equivalent of App Privacy, and enforcement has tightened considerably. Declarations must match actual behaviour including third-party SDKs. Mismatches get apps suspended rather than merely rejected, which is a harsher failure mode than Apple’s.
Target API level. Play enforces a minimum target SDK version that rises annually. Apps below the threshold cannot be updated and eventually become undiscoverable for new users. This catches apps that ship and are then left untouched for a couple of years.
Sensitive permissions. Location in the background, SMS and call log access, accessibility services, and all-files access require declared justification and often a video demonstration. Approval for these is genuinely difficult and frequently refused.
Account requirements. Play now requires account deletion capability similar to Apple’s, along with verified developer identity information. Organisation accounts need documented business verification.
Costs. Apple charges $99 per year for the Developer Program. Google charges a one-time $25 registration fee. Both take commission on digital sales at broadly comparable rates with equivalent small-business reductions.
The most reliable way to be approved first time is to design for it during development rather than auditing for it at the end.
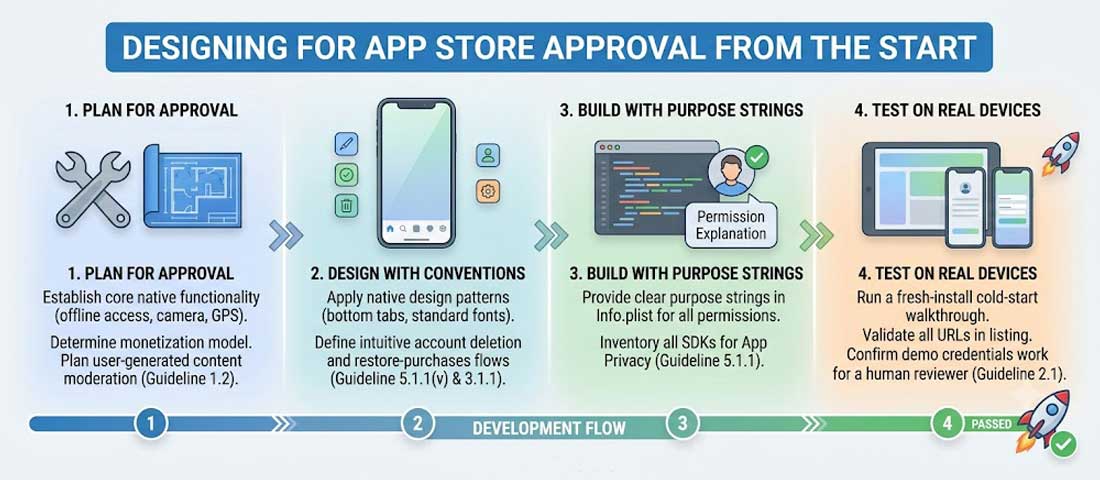
At planning. Establish what native functionality justifies the app existing. Decide the monetisation model and whether it requires in-app purchase. Determine whether accounts are necessary and, if so, plan the deletion flow. Check whether any permission you need falls into a restricted category on either store.
During design. Follow platform conventions unless you have a strong reason not to. Make the core functionality reachable within a screen or two of launch. Design the permission requests to appear in context, at the moment the feature is used, with clear explanation. Build the empty states, error states and offline states — reviewers encounter these more often than you’d expect.
During build. Implement account deletion at the same time as account creation rather than deferring it. Add restore purchases alongside purchase. Write purpose strings as you add permissions. Keep an inventory of SDKs and what each collects so the privacy declaration is a lookup rather than an investigation.
Before submission. Run the cold-start walkthrough. Test on real devices at both size extremes. Verify every URL in the listing resolves. Confirm demo credentials work. Write the review notes properly.
Teams that follow this sequence are approved on first submission the substantial majority of the time. Teams that build first and read the guidelines afterwards average two to three cycles, and occasionally discover an architectural problem that costs far more than the delay. This front-loading is a standard part of how we run mobile app development engagements, because the cost of catching a 4.2 problem at planning is a conversation, and the cost of catching it at submission is a rebuild.
Most straightforward apps can be submitted successfully by the team that built them, provided the checklist above is followed. A few situations warrant experienced input.
Get help when your app sits close to the Guideline 4.2 line and you’re not certain whether the native functionality is sufficient — an experienced assessment before development is far cheaper than a rejection after it. Get help when monetisation is complex, particularly hybrid models mixing physical goods, digital content, and subscriptions, where the in-app purchase boundary is genuinely ambiguous. Get help when you’ve been rejected twice for the same reason, which usually means the objection has been misread rather than that the fix failed. And get help when your app touches a regulated category — health data, financial services, children’s content, dating — where both stores apply additional requirements that are easy to miss and expensive to discover late.
The honest summary is that App Store approval is far more predictable than its reputation suggests, and almost all first-submission rejections come from a short list of recurring causes rather than from arbitrary judgment. Guideline 2.1 catches apps with broken demo accounts and unfinished edges. Guideline 4.2 catches web wrappers and is the only rejection on the list that can’t be fixed quickly, which is precisely why the question of what native functionality justifies your app belongs at the planning stage rather than the submission stage. Guideline 3.1.1 catches monetisation models built without accounting for in-app purchase, and rebuilding a payment flow after the fact is expensive. Everything else — metadata, privacy declarations, purpose strings, account deletion, Sign in with Apple, restore purchases — is a checklist item that takes minutes to handle correctly and costs a week to handle after rejection. The two fields that most improve your odds are the ones teams routinely leave empty: working demo credentials and clear review notes. A reviewer with four minutes and no context approves apps they can understand and rejects apps they cannot get into. Make yours easy to evaluate, run the cold-start walkthrough before you submit, and the first-time approval that feels like luck becomes the ordinary outcome.
| How long does App Store review actually take? | Most reviews complete within 24 to 48 hours, and a large share finish within a day. Apple has become considerably faster than its historical reputation. Plan for 48 hours and treat anything quicker as a bonus. First submissions of brand-new apps sometimes take slightly longer than updates to established ones, and submissions immediately before major holidays queue up noticeably — the week before Christmas and the days around Chinese New Year are consistently slower. If your review has been in progress for more than a few days without movement, you can contact App Review through App Store Connect to ask about status. Expedited review exists for critical fixes affecting live users and genuinely time-sensitive events, but it’s granted at Apple’s discretion and shouldn’t be relied on for ordinary launch timing. |
| Why do most apps get rejected? | A short list of causes accounts for most rejections. Guideline 2.1 covers app completeness — crashes, bugs, placeholder content, and very commonly a demo account the reviewer can’t log into. Guideline 4.2 covers minimum functionality and catches apps that are essentially a website in a wrapper. Guideline 5.1.1 covers privacy and data, including forcing registration for functionality that doesn’t need it and failing to declare what third-party SDKs collect. Guideline 3.1.1 catches apps selling digital content outside Apple’s in-app purchase system. Guideline 2.3 covers metadata that doesn’t match the app — outdated screenshots, overstated descriptions, keyword-stuffed names. Beyond these, missing in-app account deletion and missing Sign in with Apple alongside other social logins are both frequent and entirely avoidable. |
| Will my app get rejected if it’s just my website in an app? | Almost certainly, under Guideline 4.2. Apple consistently rejects apps that wrap a website without adding functionality a browser can’t provide. To pass, an app needs genuine native capability — useful push notifications, offline access to content, camera or sensor integration, biometric authentication, home screen widgets, background processing, or deep system integration like Apple Pay or Siri shortcuts. The framework you build with doesn’t matter; React Native, Flutter and Capacitor apps are all fine. What matters is what the app does. This is the one rejection reason that can’t be fixed quickly, because the objection is to what the product is rather than to how it was submitted. Decide at planning what justifies the app existing, and if you can’t answer that convincingly, a fast mobile-optimised website may serve your customers better than an app they’d install once and delete. |
| Do I have to use Apple’s in-app purchase system? | Only for digital goods and services consumed within the app — digital content, subscriptions to digital services, premium features, virtual currency, game items, ad removal, and access to digital media. These must go through Apple’s in-app purchase, which carries a 30% commission, reduced to 15% under the Small Business Program and for subscriptions after the first year. Physical goods, real-world services, ride-hailing, food delivery, event tickets and professional services are all exempt and can use Stripe, Razorpay or any processor with no Apple commission. The confusion usually arises at the boundary: a fitness app selling equipment through Stripe is fine, while the same app selling a workout programme through Stripe is a rejection. Rules for reader apps and external purchase links have shifted repeatedly under regulatory pressure and continue to change, so verify the current position if your model depends on them. |
| What should I write in the review notes? | Treat it as a briefing for someone who has never heard of your business and has four minutes to spend. Explain in two sentences what the app does and who it’s for. Describe how to reach the main functionality from a cold start, especially if it isn’t obvious from the first screen. Explain anything that might look questionable — why you request a particular permission, why a feature works the way it does, why the app targets a specific region or user type. If there’s a feature a reviewer might not find, say exactly where it is. If you’re resubmitting after a rejection, reference what changed. This field is routinely left blank and it’s one of the highest-leverage five minutes in the whole submission, because a reviewer who understands your app evaluates it on its merits rather than rejecting on confusion. |
| What do I do if my app gets rejected? | Read the cited guideline in full rather than working from the summary in the rejection message — the specific wording usually makes the required change clear, and reviewers often attach a screenshot or screen recording showing the problem. Before rebuilding anything, reply in Resolution Centre if the reason is unclear or you think the reviewer misunderstood something; this is a real conversation channel with responses typically within a day, and many rejections resolve through explanation alone, particularly when a reviewer couldn’t locate a feature that does exist. Be factual and direct, explain where things are, and avoid arguing interpretation or citing competitors doing the same thing. If the guideline genuinely doesn’t apply, the App Review Board appeals process exists, though it takes longer than fixing and resubmitting so it’s worth using only when a fix would damage the product. When you do resubmit, describe what changed in the review notes. |
| Is Google Play easier to get approved on than the App Store? | Faster, but not necessarily easier, and the failure modes are harsher. Play leans on automated review with human escalation for flagged cases, so updates to established apps often publish within hours rather than days. But Play has tightened considerably in recent years. Data safety declarations must match actual app behaviour including third-party SDKs, and mismatches get apps suspended rather than merely rejected. Target API level requirements rise annually, and apps below the threshold eventually can’t be updated at all. Sensitive permissions — background location, SMS and call log access, accessibility services, all-files access — require declared justification and often a video demonstration, and approval is genuinely difficult. New developer accounts also face additional testing requirements before production release. Plan for both stores rather than assuming Play is a formality after clearing Apple. |
Planning an App and Want it Approved on the First Submission?
We build and ship mobile apps for both stores, and we plan for approval from the first architecture conversation rather than auditing for it at the end. With 14+ years of experience and 550+ clients served, we know which decisions cause rejections months later — and we’ll tell you honestly if what you’re describing would be better served by a fast mobile website than by an app. Send us your app concept and we’ll respond within one business day with a straight read on the approval risks and how to design around them.
You are welcome to begin with the complimentary business health check. It takes about ten minutes and will suggest which of these would serve you best.